All Fabrics
 Precuts
 Patterns
 Designers
 Manufacturers
 Where to Buy
 Customers Only
 New customers


Ask Margrit Spring 2008
Quilting Questions Answered
The e-Forum column is dedicated to you, the quilter. I would like to encourage you to participate in the e-Forum by submitting any events, thoughts, questions and hints to “Ask Margrit” and submitting your information via e-mail. If you submit information regarding quilting events in your area, we will post as many as possible. Please submit at least 2 months prior to the event.
I have had a number of questions that address in one way or another how to finish a quilt. Rather than just address each specific question the following is a more complete answer that goes beyond the normal instruction of layer, quilt, and bind. I hope you will find it helpful. As always, if you have any suggestions please let me know.
Finishing the Quilt
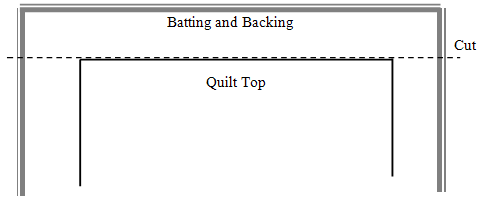
1. Cut the back yardage so that it is about 4" larger on all sides than the quilt top. If necessary piece 2 lengths of fabric together. If piecing cut the selvage off one side of both pieces, and stitch those edges together.
2. Trim batting to the same size as the backing.
3. Layer the backing wrong side up, the batting, and the quilt top right side up. Safety pin or hand haste the layers together. Hand or machine quilt layers together.
4. After quilting, trim the backing and batting even with the quilt top.
5. Using a basting stitch, (longest stitch length on a machine) sew 1/8" from the outside edges around the entire quilt. This will keep the quilt layers from shifting as you are sewing on the binding.
Binding the Quilt
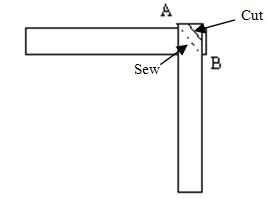 1. For 1/4" finished binding cut 2-1/4" wide strips the width of the fabric. Sew strips together using diagonal seams. Place strips right sides together with ends at right angles. Draw a line from A to B Sew on the dotted line, and cut on the solid line. Press seams open. Continue sewing strips together to make a continuous binding strip that will go around the perimeter of the quilt. Use a matching thread and small stitches when sewing binding strips together so stitching does not show.

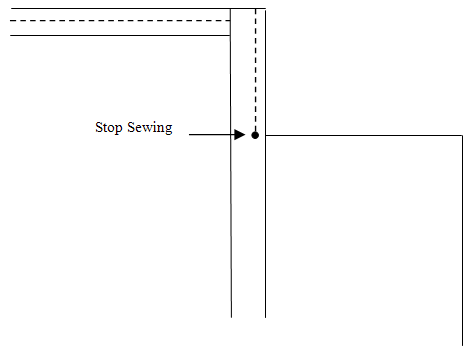
3. Fold the strips in half lengthwise, wrong sides together and press the entire length of the strip. With raw edges together, and starting a least 6" from the corner of the quilt, pin the binding to one side of the quilt. Make sure to leave the first 3 to 4 inches of the binding unattached. Sew the binding to the quilt using a 1/4" seam allowance. Stop sewing 1/4" from the corner and backstitch.
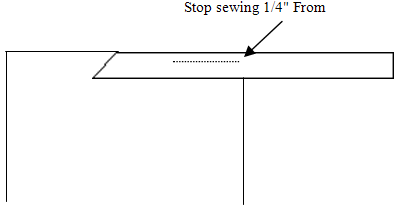
4. Fold the binding strip at a right angle so that it is extended upward and even with the 2nd side of the quilt.

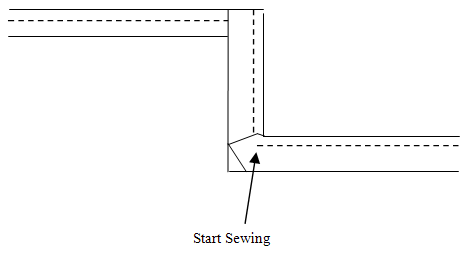
5. Fold the binding down even with the 2nd side of the quilt. Make sure the top fold is even with the 1st side of the quilt. Start sewing at the top and sew to within 1/4" of the next corner. Repeat.
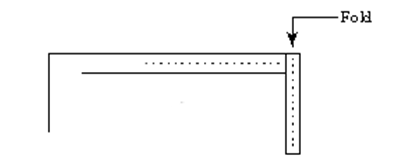
6. To finish binding continue sewing binding to within 6" of the beginning. Remove the quilt from the machine. Open fold.
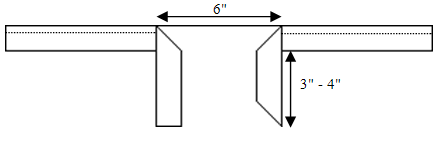
7. Laying the quilt on a flat surface lay the right tail over the left tail. Where they meet, draw a 45º angle on the left tail.
![]()
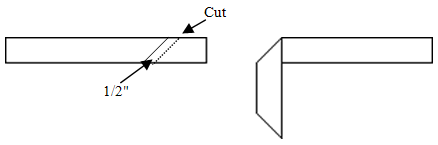
8. Measure over 1/2" from the drawn line and draw a line parallel to the first line. Cut off the excess binding.
9. Join the ends together with a diagonal seam, press seam open and refold the binding in half. Finish sewing the binding to the quilt. Turn the binding to the backside of the quilt and stitch to the back by hand with a thread that matches the binding.
![]()
Of course not all bindings are just straight sides. I had a interesting question about how to bind a quilt where the corners had been cut out so the quilt would fit around a bedpost.
1. Bind the outside corners as usual.
2. Sew to inside corner and stop at the corner.
3. Pinch up a quarter inch of binding and start sewing on the opposite side of the pinched 1/4" binding. Sew to the next corner.
For the bias binding I have found that Darlene Zimmerman's method for cutting the bias to be one of the most efficient. Darlene has graciously given permission for me to explain that method for this column.
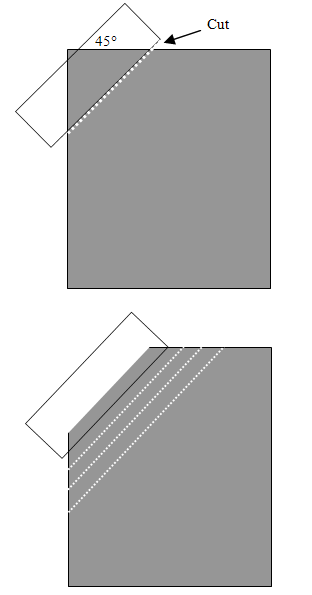
1. Trim of the raw edges from the top and bottom of the fabric piece. Trim off all selvages.
2. Open the fabric so you are only cutting one layer.
3. Cut off one corner (approx. 6-7 inches) at a 45° angle by aligning the 45° line on the ruler with the top edge of the fabric and trim off one corner. (Save the corner for another project)
4. Lay the ruler along the bias edge and cut the bias strips at 2-1/4".
5. Sew the strips together end-to-end and continue to bind as for a straight strip binding.
More information and techniques for edging and finishing quilts can be found in Darlene Zimmerman's book The Quilter's Edge.